使用 Python Block 找訊號波包
... 2021-05-08 About 4 min
# 使用 Python Block 找訊號波包
GNU Radio 允許我們利用 Python 和 C++ 來撰寫自己的模組,然後將模組放到 GNU Radio 的程式庫中使用。但是要撰寫一個模組,牽涉到的細節較多,有興趣的讀者可以參考 官網的說明 (opens new window)。不過在擴充模組的方式中,有一種比較簡單的方法,叫做 Python Block,這是 GNU Radio 程式庫中所提供的一個模組,使用這個模組,要進行擴充會比較容易一點。本節將以上述 AM 訊號解碼的應用為例,來說明撰寫的方法。
在上一小節中,我們提到,經過 Complex to Mag 模組之後的訊號,其實是載波乘上訊號的絕對值,實際上它的波包才是我們要的訊號。在上一小節中,我們是使用低通濾波器,由於波包的部份屬低頻訊號,因此大致也可以把訊號的波包找出來。那這邊,我們要試著用 Python 寫一個程式來尋找訊號的波包。
首先在 GNU Radio 程式庫中拉出來一個 Python Block 的模組,將其點開之後,會看到如下的畫面:

接著按一下 Open in Editor 那個鈕,會看到以下的 Python 程式:
"""
Embedded Python Blocks:

Each time this file is saved, GRC will instantiate the first class it finds
to get ports and parameters of your block. The arguments to __init__  will
be the parameters. All of them are required to have default values!
"""

import numpy as np
from gnuradio import gr


class blk(gr.sync_block):  # other base classes are basic_block, decim_block, interp_block
    """Embedded Python Block example - a simple multiply const"""

    def __init__(self, example_param=1.0):  # only default arguments here
        """arguments to this function show up as parameters in GRC"""
        gr.sync_block.__init__(
            self,
            name='Embedded Python Block',   # will show up in GRC
            in_sig=[np.complex64],
            out_sig=[np.complex64]
        )
        # if an attribute with the same name as a parameter is found,
        # a callback is registered (properties work, too).
        self.example_param = example_param

    def work(self, input_items, output_items):
        """example: multiply with constant"""
        output_items[0][:] = input_items[0] * self.example_param
        return len(output_items[0])
1
2
3
4
5
6
7
8
9
10
11
12
13
14
15
16
17
18
19
20
21
22
23
24
25
26
27
28
29
30
31
2
3
4
5
6
7
8
9
10
11
12
13
14
15
16
17
18
19
20
21
22
23
24
25
26
27
28
29
30
31
這個程式最主要有兩個部份,第一個是 __init__ 那個函式,其中函式的參數中宣告了一個 example_param 的變數,這個變數會出現在模組的參數列中,供使用者進行設定。另外在第 21 行設定了 name 的值,這個就是模組會顯示的名稱。參數傳進來之後,第 27 行使用 self.example_param 把它存起來,變成物件的變數,這樣就可以在其他的函式中使用。
另外一個主要的函式,就是 work,這個函式傳進來的參數是 input_items 及 output_items,這兩者就是這個模組的輸入和輸出,注意每一個模組的輸入和輸出都可能有很多個(回想一下 Multiply 那個模組),對於單獨的輸入和輸出模組來說,我們必須處理的部份是 input_items[0] 和 output_items[0],每一個都還是一個陣列之類的型態。最後函式必須回傳一個整數,表示輸出了幾個資料元素。
在這個例子中,主要是把輸入的資料乘上一個常數,然後傳到輸出陣列當中,因此輸入的資料個數和輸出資料個數是相同的。
在我們的應用範例中,主要是要尋找訊號的波包,基本上可以使用一個簡單的遞迴式來取得近似值:
output[i] = w0 * input[i] + (1-w0) * output[i-1]
這邊 w0 是一個介於 0 和 1 的參數。
現在將 Python 程式碼中的兩個函式改成所下所示的程式碼:
    def __init__(self, coeff=0.8):  # only default arguments here
        """arguments to this function show up as parameters in GRC"""
        gr.sync_block.__init__(
            self,
            name='My Am Demod',   # will show up in GRC
            in_sig=[np.float32],
            out_sig=[np.float32]
        )
        # if an attribute with the same name as a parameter is found,
        # a callback is registered (properties work, too).
        self.coeff = coeff
        self.lasts = 0.0

    def work(self, input_items, output_items):

        idata = input_items[0]
        ilen = len(idata)
        w0 = self.coeff
        w1 = 1-w0

        output_items[0][0] = w0 * idata[0] + w1 * self.lasts
        for i in range(1, ilen):
            output_items[0][i] = w0 * idata[i] + w1 * output_items[0][i-1]

        self.lasts = output_items[0][ilen-1]
        return ilen
1
2
3
4
5
6
7
8
9
10
11
12
13
14
15
16
17
18
19
20
21
22
23
24
25
26
2
3
4
5
6
7
8
9
10
11
12
13
14
15
16
17
18
19
20
21
22
23
24
25
26
這裡我們把模組命名為 My Am Demod,另外在程式第 26 行的位置,我們把輸入的最後一個元素保留下來,主要給下一回合使用(程式第 22 行)。
現在將整個系統改成如下的架構:
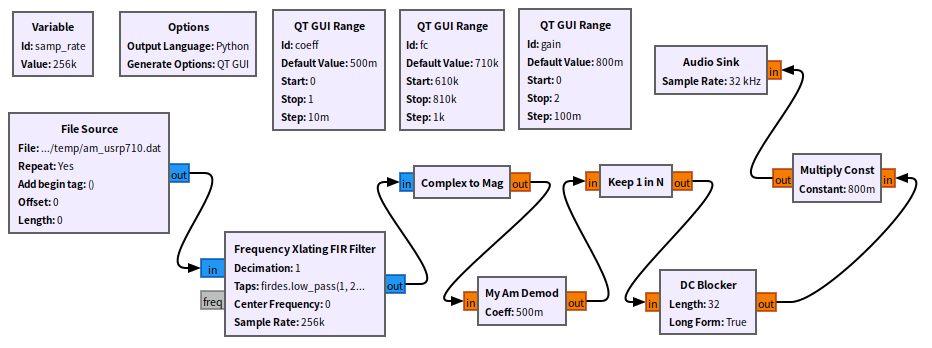
訊號經過我們定義的模組 My Am Demod 之後,應該已大致取得原始的訊號,但是要播放之前,仍必須降低抽樣速率,這邊我們只簡單使用 Keep 1 in N 這個模組,其中參數設定為 8。
將系統存檔並執行,然後試著調整頻率以及 coeff 參數(試著調小一點),看看解碼的效果如何。
練習
在上面的系統架構中,我們使用了 Complex to Mag 模組,把複數的部份變成其振幅大小,之後才連接我們自製的 Python 模組。 現在試著把 Complex to Mag 這個模組的功能,一起放到我們的 Python 模組當中。(提示:把輸入的型態從 float32 改成 complex64,就可以改變輸入的資料類型。另外,使用 np.abs(x) 可以把 x 陣列中每個複數值都變成其絕對值大小)